What is a Cabin Filter and How Often Should You Replace It?
A Cabin Filter is a vital component in your vehicle. It ensures clean air enters the cabin. According to John Smith, an auto technician and industry expert, “A clean cabin filter can make a world of difference in your driving experience.”
Many drivers overlook the cabin filter until issues arise. Over time, it can become clogged with dust and pollutants. This can lead to unpleasant odors and reduce air quality. Replacing the cabin filter regularly is essential for a healthy driving environment. The general recommendation is every 15,000 to 30,000 miles, but this may vary depending on driving conditions.
Not everyone adheres to this guideline. Some might not think about it until they notice issues like foggy windows or weird smells. It's easy to forget, yet the impacts on comfort and health are significant. Taking the time to understand the importance of the cabin filter could lead to a more pleasant ride. A clean filter can enhance your overall driving experience.
What is a Cabin Filter and Its Purpose in Vehicles
A cabin filter is an essential component in your vehicle. It works to purify the air entering the cabin. By trapping dust, pollen, and other pollutants, it ensures that your ride is as comfortable as possible. A clean cabin filter contributes to better air quality, enhancing the overall driving experience.
Dirty cabin filters can cause musty odors and restrict airflow. This can lead to discomfort, especially during long drives. Regular checks are important. Many people overlook this simple maintenance task, leading to worse air quality over time.
Tips: Keep an eye on your filter every season. If you start to notice a decrease in airflow, it might be time for a change. You can also check it during routine oil changes. Remember, a little attention goes a long way in ensuring a pleasant drive. A clean filter can even help make your vehicle's heating and cooling systems more efficient.
How Cabin Filters Work to Improve Air Quality
Cabin filters play a crucial role in maintaining air quality inside vehicles. They trap dust, pollen, and pollutants from the air entering the cabin. This process ensures that passengers breathe cleaner air. As the filter collects more particles, its effectiveness decreases. Thus, regular replacement is essential for optimal performance.
When cabin filters are dirty, they can contribute to unpleasant odors. This buildup can also restrict airflow, making the heating and cooling systems less efficient. Clearing out the filter allows fresh air to circulate freely. It’s important to be aware of how often the filter is used. Different driving conditions may necessitate more frequent changes.
Some drivers forget to check the cabin filter until they notice issues. It's easy to overlook this small component, but doing so can lead to larger problems. Checking the filter regularly can help avoid discomfort and maintain a healthier environment. If you notice a decrease in air quality, it might be time to take a closer look at your cabin filter.
What is a Cabin Filter and How Often Should You Replace It? - How Cabin Filters Work to Improve Air Quality
| Filter Type | Average Replacement Interval (Miles) | Benefits | Signs of Wear |
| HEPA Filter | 15,000 - 30,000 | Removes allergens and particles | Reduced airflow, odd smells |
| Activated Carbon Filter | 12,000 - 15,000 | Eliminates odors and volatile compounds | Foul odors, increased dust |
| Standard Filter | 10,000 - 12,000 | Basic air filtration | Dust accumulation, poor air quality |
| Electrostatic Filter | 20,000 - 30,000 | Captures small particles effectively | Increased respiratory issues, dirty filter |
Common Signs That Indicate a Cabin Filter Needs Replacement
A cabin filter is essential for a vehicle’s air quality. It cleans the air entering the cabin. When it’s dirty, several signs may appear, indicating replacement is necessary.
If you notice a musty smell inside the car, this could signal a clogged filter. This odor often comes from mold or mildew. Another sign is reduced airflow from the vents. When the filter is blocked, air cannot flow freely. You might also see an increase in dust settling on the dashboard.
Tips for maintaining your cabin filter include checking it regularly. Aim to inspect it every few months. Replace the filter annually, or sooner if you drive in dusty conditions. Remember, a clean filter enhances comfort and air quality. Don’t ignore those warning signs; addressing them can lead to a healthier driving environment.
Recommended Replacement Frequency for Cabin Filters
Cabin filters play a crucial role in ensuring clean air inside your vehicle. They trap dust, pollen, and other particles from entering through the air conditioning system. Over time, these filters can become clogged. This makes them less effective. You may notice a musty odor or reduced airflow when this happens.
So, how often should you replace your cabin filter? Many experts suggest every 12,000 to 15,000 miles. However, this can vary depending on your driving habits. If you often drive in dusty or polluted areas, you might need to change it more frequently. Some people overlook this essential task, leading to poor air quality. Regularly checking your filter can save you from respiratory issues.
It's not just about replacing the filter. It's about awareness, too. Many forget that a clean cabin leads to a healthier driving experience. Pay attention to your vehicle’s performance. If you hear unusual noises from the ventilation system, it might be time to inspect your cabin filter. Don't wait until you notice the symptoms; proactive maintenance is key.
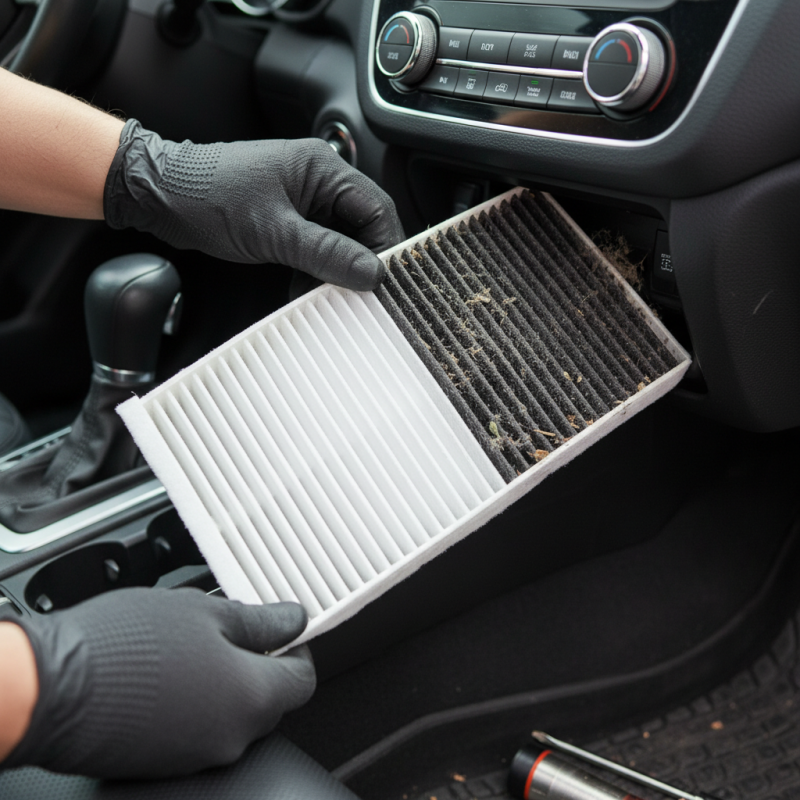
How to Replace a Cabin Filter: A Step-by-Step Guide
Replacing a cabin filter is a straightforward task. It helps to ensure clean air circulates in your vehicle. Over time, the filter can get clogged with dust and debris. This can lead to unpleasant odors and reduced air quality.
Begin by locating the cabin filter. It is usually found behind the glove box or under the dashboard. You may need a screwdriver to access it. Carefully remove the cover and pull out the old filter. Inspect it. Does it look dirty? If it does, it's time for a change.
When installing the new filter, ensure it fits snugly. Make sure it’s positioned correctly, following the airflow arrows. Replace the cover and check that everything is secure. It’s an easy job. However, some may find it daunting. Don't worry if it takes a bit longer than expected. Just take your time and breathe easily once it's done.